

Next, it was time to put the frets in. After sanding the radius into the neck (which has to be done after the inlays are in), many of the fret slots need to be recut as they loose the required depth for the fretwire. The first couple pictures show the fretting in progress and the next two show the completed fretboard (the last shows it with the other two necks I have fretted).


My customer that requested the emerald green Telecaster also wanted some body contouring, so I gave it a similar back contour as a Strat would have. I did not to it on the front as I did not want to go through the thin (1/4") maple. Here are a couple shots of what that looks like. This one is a "tummy contour" as it is on the upper side of the guitar when being played. I will ask if she wants a contour on the lower side too or if she just wants the one.


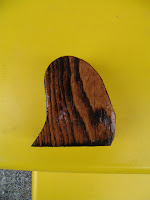
Finally, I have some color samples to show of what all the guitars are going to be finished like. I will not explain a whole lot on each one as I did not use any special techniques for them, I just wiped the stain on with a sponge brush and then brushed on the lacquer with a cheap, disposable brush. For the actual guitars, I may still brush on the stain (except on the sunbursts), but I will be spraying the lacquer. I just did not have the time or space to pull out all the spray equipment just to do a couple test pieces.
The first couple pieces are for the emerald green Telecaster (just in case you could not tell). The larger piece was sanded just before putting the lacquer on to lighten the main wood and highlight the figure. The second piece had the lacquer applied without sanding down the stain.

Here is the amber I am going to use for the semi-hollowbody Telecaster. I used several coats to get it the proper golden amber color.

These are two different attempts at the sunburst for the semi-hollowbody Les Paul. The first uses an antique maple base coat and on the left side, the medium brown sunburst, the right side has a darker brown and the top has a mixture of both. The piece on the right used the vintage amber base coat and then I applied cherry to the right side (diagonal part), the bottom and half the top is the medium brown mixed into the cherry, and the top is the cherry, medium brown and dark brown all mixed together. I just wanted to try a few different color combinations to determine which look was best. Let me know your opinions. Of course the final decision will be with my customer. The bottom picture shows them side by side. Remember, the sunburst will be sprayed on, so the edge will not be so defined.


These two pictures show the ash used on the back of the semi-hollowbody guitars. The one on the left has no grain filler and is just brushed with medium brown. The one on the right has a dark grain filler, which is sanded down to highlight the grain and then is brushed with the medium brown. I will also do a sample like this of the green on the alder wood so the customer can decide which way to finish it.


Lastly, my customer who is buying the semi-hollow Les Paul requested a clear pick guard. The places I normally order stuff from do not carry clear Les Paul pick guards and the places that do carry them charge too much. Since my in-laws now carry acrylic plastic sheets, I thought I would try my hand at making one rather than buying one. Here is the result. I was able to buy one sheet, big enough to make five or six pick guards for $1.50 from them rather than spending $14 for one clear pick guard. Even though it is a different material, I think it should work fine and the figure of the wood still shows through.


Well that's it for now. Its time for me to get ready to go camping one more time this year. We are going with friends that have a nice new camper, so it will be our first time camping in a camper. Should be nice since the weather this week decided to cool off and get cloudy with a bit of misty drizzle. Let me know what you think. I am especially looking for feedback on the finishes. Take care and I'll post again when I have anything new.
Aaron
1 comment:
Looking good Aaron! Thanks for bringing the color samples over yesterday so that we could see what all the guitars are going look like finished.
I think that the samples looked better in real life than the photo's, but that is not surprising. The samples were big enough to visualize what they will look like, but it will be interesting to see the finished product.
Where are you going camping, and was some one watering and feeding Archie for you? Enjoy your time away, you will never regret getting away from the everyday activities. I just wish that I had done more of that myself, but things were a little different around here then.
Post a Comment