Friday, September 14, 2007

Dots, frets, shaping, color, and guard

OK, here's what I've done this week. I finally got the dots (they arrived this week, but without the fish) and the fish (which arrived this week) to install in the rosewood fretboard. This is the third attempt for this guitar, but the first with the new fretboard. Things went much easier and nicer without having to add contrast to the fretboard so the inlays would show up. Maybe someday I will master the technique, but for now, I think I will only do inlays if there is enough contrast! The first two show the dots going in (you can see on the first picture one hole that is just drilled without a dot). The next two show the fretboard once the Ixthus (Jesus fish) had been inlaid. As you can see, this went much better than the previous attempt.


Next, it was time to put the frets in. After sanding the radius into the neck (which has to be done after the inlays are in), many of the fret slots need to be recut as they loose the required depth for the fretwire. The first couple pictures show the fretting in progress and the next two show the completed fretboard (the last shows it with the other two necks I have fretted).


My customer that requested the emerald green Telecaster also wanted some body contouring, so I gave it a similar back contour as a Strat would have. I did not to it on the front as I did not want to go through the thin (1/4") maple. Here are a couple shots of what that looks like. This one is a "tummy contour" as it is on the upper side of the guitar when being played. I will ask if she wants a contour on the lower side too or if she just wants the one.


Finally, I have some color samples to show of what all the guitars are going to be finished like. I will not explain a whole lot on each one as I did not use any special techniques for them, I just wiped the stain on with a sponge brush and then brushed on the lacquer with a cheap, disposable brush. For the actual guitars, I may still brush on the stain (except on the sunbursts), but I will be spraying the lacquer. I just did not have the time or space to pull out all the spray equipment just to do a couple test pieces.

The first couple pieces are for the emerald green Telecaster (just in case you could not tell). The larger piece was sanded just before putting the lacquer on to lighten the main wood and highlight the figure. The second piece had the lacquer applied without sanding down the stain.


Here is the amber I am going to use for the semi-hollowbody Telecaster. I used several coats to get it the proper golden amber color.


These are two different attempts at the sunburst for the semi-hollowbody Les Paul. The first uses an antique maple base coat and on the left side, the medium brown sunburst, the right side has a darker brown and the top has a mixture of both. The piece on the right used the vintage amber base coat and then I applied cherry to the right side (diagonal part), the bottom and half the top is the medium brown mixed into the cherry, and the top is the cherry, medium brown and dark brown all mixed together. I just wanted to try a few different color combinations to determine which look was best. Let me know your opinions. Of course the final decision will be with my customer. The bottom picture shows them side by side. Remember, the sunburst will be sprayed on, so the edge will not be so defined.


These two pictures show the ash used on the back of the semi-hollowbody guitars. The one on the left has no grain filler and is just brushed with medium brown. The one on the right has a dark grain filler, which is sanded down to highlight the grain and then is brushed with the medium brown. I will also do a sample like this of the green on the alder wood so the customer can decide which way to finish it.

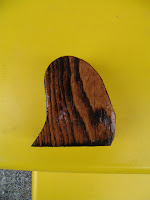

Lastly, my customer who is buying the semi-hollow Les Paul requested a clear pick guard. The places I normally order stuff from do not carry clear Les Paul pick guards and the places that do carry them charge too much. Since my in-laws now carry acrylic plastic sheets, I thought I would try my hand at making one rather than buying one. Here is the result. I was able to buy one sheet, big enough to make five or six pick guards for $1.50 from them rather than spending $14 for one clear pick guard. Even though it is a different material, I think it should work fine and the figure of the wood still shows through.


Well that's it for now. Its time for me to get ready to go camping one more time this year. We are going with friends that have a nice new camper, so it will be our first time camping in a camper. Should be nice since the weather this week decided to cool off and get cloudy with a bit of misty drizzle. Let me know what you think. I am especially looking for feedback on the finishes. Take care and I'll post again when I have anything new.

Aaron

Wednesday, September 05, 2007

Pain in the Necks

Well, fortunately, there was not really anything painful about working on the necks I did today, in fact, everything went pretty well. I started off by installing the frets (gold) into the semi-hollowbody Les Paul neck. Compared to the last guitar I did (black Strat), these fretboards have been a piece of cake. I still am not sure if it is because the last guitar used an ebony fretboard or if it is the fretwire and or fret saw's cutting width, but so far, I have done a maple and a rosewood fretboard and both were easier than the ebony with the other fretwire. The first two pictures show the fretting in progress and the third shows the completed fretboard. Also, on the third picture, you may be able to see globs of superglue I put down to fill in some gaps on the inlay.


Well, since I am still waiting on the dots for the third attempt on the semi-hollowbodied Tele neck (they should arrive tomorrow or Friday), I decided to work on the other guitars I have been putting off (the solidbody Les Paul and the SG). Since I had already split the neck blank so I could make two necks from it, I decided to start working on them. The first picture shows one of them on the bandsaw getting the side profile cut. The next picture shows the truss rod slot being routed in. I figured out how to use the edge guide on the other Les Paul I am building, so the channel is much easier and accurate to do now. The third picture shows the truss rod in the slot and the fourth picture shows the front profile cut (except the headstock shape).


Well, I did it again. That first neck went so smoothly, I decided to do another. I will use one on the Les Paul and the other for the SG. You can see the fronts of both of them in the first picture and the second shows one's front and the other's side profile.


Well, here's the body for the SG. I actually cut this and routed the pickup cavities and electronics channel back when I was working on the skeleton Strat copy. It has just been sitting around ever since, so since I was feeling productive today, thought I would work on it some more. I got the neck pocket routed out and the neck fitted to it (the neck tennon had to be shortened and I had to thin out the profile of the tennon as the pocket is smaller on the SG than on the Les Paul). I started using a forstner bit to take the bulk of the wood out and then used the router. Next, I had to use some angled profile templates to cut the correct angle in the neck pocket and then on the top of the body at the neck tennon.


Here's the body with the neck in the neck pocket. It fits pretty good, especially for not having routed the neck tennon with the template. You can see the heel of the neck sticks out past the back of the body quite a bit. Also, on the profile shot, you can see how the neck angle continues on to the body.This is because the profile template I used on the neck is for the Les Paul. It will need to be trimmed down flush with the back of the guitar's body. You can see that the neck and body woods are two different colors. This is partially because the body got a bit of overspray from the black Strat and partially because the body is made of Sappele mahogany and the neck is Honduran mahogany. Once it gets sanded down, grain filled, and stained, it should not be as noticeable.


Here is the back of the neck joint. You can see that I have already shaved off the excess wood at the heel. It still needs more work, but that will get done when I carve the neck. The next picture is just a full back shot. Next time I get over to the shop (hopefully I can get over there tomorrow and Friday), I plan to carve the edges of the body. I am going to try to do a smooth body to neck joint and round out the neck extension on the back of the body.


Well, that's all for now. I hope you like what you see. If you know anyone in the market for an SG style guitar, let me know and I can try to hook you up. I am planning on using a one piece wraparound tailpiece/bridge with individual saddles and black hardware. I will be using two humbuckers with chrome covers. I am not sure if I will add a coil splitter or just do standard electronics. Amazingly, I was only at the shop for about four hours today and I got all this done. Either that means that I am getting better, or I just did not have any problems like I normally seem to run into (or a combination of the two). Hopefully I can be this productive more often. Well, take care, I'll update when I get more done.

Aaron

Shapin' the Necks

OK, so I actually did all of this yesterday and not today, which is why I am also having a second post today. I went to the shop and decided it would be a fine day to start carving the necks. I decided to go with the Les Paul neck first, which meant I had to use a draw knife, rasps, and files to get the basic shaping done. I then went over it with 60, 120, and 220 grit sand paper. I don't have any real in progress pictures, but here is how it came out. I will probably be taking a bit more thickness off the back of the neck to make it a bit easier to play. Right now it is probably about the right size for a 50s neck, which has been called a baseball bat neck due to its large, round back. I prefer something that is between that and the really thin necks and I have had several people comment on how comfortable my necks are to play, so that is what I will go for.


Here are a couple shots of the neck sitting in the body. Still not ready to be glued in, but its getting there. You can see there are some gaps, so I will need to do some more filing/sanding to get closer tolerances.


Next, I worked on the neck for the solidbody Telecaster guitar. This neck is already pretty thin, so the profile will be a bit flatter than the other necks, but it should work fine. Because it does not have a heel or angled headstock, I do the initial shaping using a routerbit designed for stairway rails, so it is a good fit for the hand. Then, I used the rasps, files, and sandpaper. The first two shots are just different angles while it is being worked on and the last two are after sanding and spraying with water to make the maple's figure show up a bit better.


Here are a couple shots of the neck in the guitar's body. It is actually starting to look like a guitar! It is always nice when that happens. As you can see this is the guitar that is going to have a third (middle) pickup and a tremolo.


Lastly, is the neck formerly known as the problem child. I should not have any more problems with it as I do not need to make up for lack of contrast with the inlays, so I will just drill holes the right size and rout the fish as close as I can get it and just use clear super glue to set them in. The transition from the neck to the headstock is looking really nice on this one in my opinion, but like the Les Paul neck, it is still feeling a bit round and large, so I will continue to slim down the profile for ease of playing. Once the gold dots and fish come in, I will inlay and radius the fretboard and put the gold frets in.


Here are two pictures of the neck placed into the neck pocket. It is a fairly simple guitar, but should look nicer than the run of the mill Telecaster due to the nice figured maple top and neck as well as the gold hardware.


Hopefully I will get to sanding and starting the finishes in the next couple weeks. I was reading my new guitar finishing book and found out that I was going overkill on the sanding on my previous guitar, which actually makes it harder for the finish to adhere to the wood, so now that I actually kind of know what to do, the finishes should come out nicer than my previous finishes. I also have two new spray guns and a nicer compressor available to use. Well, thanks for checking my blog, don't forget to check out my other post for today that actually shows what I did today. As always, please give me any feedback you come up with. Ta ta for now,
Aaron